Authentication to SharePoint Online looks really complicated when you look at those multiple redirects in the browser from the time you enter your password till you end up in your SharePoint Page.. Phew..But it is not.. TILL YOU CRACK IT.
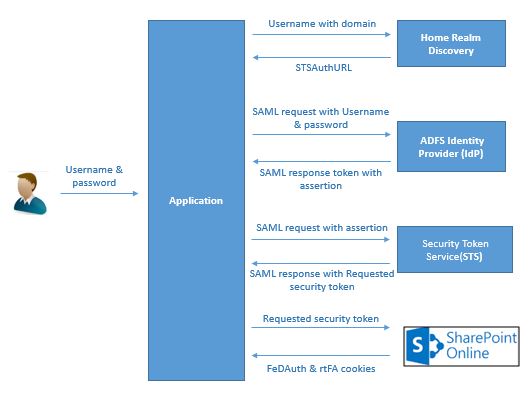
SharePoint Online uses Secure Token Service (MSO STS) to authenticate the user. The request with user credentials is posted to STS to validate the user. On validation STS sends the security token as response which is posted to SPO & we receive 2 authentication cookies FedAuth and rtFA.
Federation Authentication (FedAuth) cookie is particular to a particular top level site. The root Federation Authentication (rtFA) cookie is for all top level sites in SharePoint Online. When a user is logged in to a particular site collection and moves to another site collection, the user is silently authenticated using RTFA cookie without prompting the user for credentials. rtFA also enables the user to sign out from all the SharePoint sites when deleted from the application.
.NET Client Object Model authenticates to SharePoint Online using SharePointOnlineCredentials which is part of Microsoft.SharePoint.Client.dll. I executed the following code in a console application and captured the fiddler network traffic.
static void Main(string[] args)
{
var url = "https://mysite.com/";
 Uri uri = new Uri(url);
  ClientContext context = new ClientContext(url);
  SecureString secureStringPass = new SecureString();
  var myUserName = "MyUserName"
  var myPassword = "MyPassword";
  foreach(char p in myPassword.ToCharArray()) secureStringPass.AppendChar(p);
  var cred = new SharePointOnlineCredentials(myUserName, secureStringPass);
  context.Credentials = cred;
  context.ExecuteQuery();
  var authCookie = cred.GetAuthenticationCookie(uri);
  Console.WriteLine("cookie = " + authCookie);
  Console.ReadLine();
 }
To Authenticate to SharePoint Online with SSO enabled from applications built on non SharePoint platforms, we can follow the post requests as captured in fiddler for the above console and it goes as below:

Response
When provided with valid credentials a SAML token with assertion will be provided as response. The assertion is as follows:
Response
We will receive a RequestedSecurityToken as part of response from STS as follows:
Extract the value in BinarySecurityToken tag.
- Step 1
The first request is made to Home Realm Discovery with the username.This uses, Suffix routing which allows ADFS to select the appropriate claims provider based on the domain suffix provided by the user during logon. Eg: users with mysite.com domain suffix will send authentication requests to mysite identity provider.
Request
 POST https://login.microsoftonline.com/GetUserRealm.srf HTTP/1.1
 Content-Type: application/x-www-form-urlencoded
 Host: login.microsoftonline.com
 login=myuserName%40mySite.com&xml=1

STSAuthURL in response provides the URL of the identity provider to which authentication requests are to be posted.
- Step 2
Post the following as request body to the STSAuthURL.
Request
Request
 <?xml version="1.0" encoding="UTF-8"?>
 <s:Envelope xmlns:s="http://www.w3.org/2003/05/soap-envelope" xmlns:saml="urn:oasis:names:tc:SAML:1.0:assertion" xmlns:wsa="http://www.w3.org/2005/08/addressing" xmlns:wsp="http://schemas.xmlsoap.org/ws/2004/09/policy" xmlns:wssc="http://schemas.xmlsoap.org/ws/2005/02/sc" xmlns:wsse="http://docs.oasis-open.org/wss/2004/01/oasis-200401-wss-wssecurity-secext-1.0.xsd" xmlns:wst="http://schemas.xmlsoap.org/ws/2005/02/trust" xmlns:wsu="http://docs.oasis-open.org/wss/2004/01/oasis-200401-wss-wssecurity-utility-1.0.xsd">
   <s:Header>
    <wsa:Action s:mustUnderstand="1">http://schemas.xmlsoap.org/ws/2005/02/trust/RST/Issue</wsa:Action>
    <wsa:To s:mustUnderstand="1">[STSAUTH URL RECEIVED FROM STEP 1]</wsa:To>
    <wsse:Security>
      <wsse:UsernameToken wsu:Id="user">
       <wsse:Username>[myuserid@mysite.com]</wsse:Username>
       <wsse:Password>[mypassword]</wsse:Password>
      </wsse:UsernameToken>
    </wsse:Security>
   </s:Header>
   <s:Body>
    <wst:RequestSecurityToken Id="RST0">
      <wst:RequestType>http://schemas.xmlsoap.org/ws/2005/02/trust/Issue</wst:RequestType>
      <wsp:AppliesTo>
       <wsa:EndpointReference>
         <wsa:Address>urn:federation:MicrosoftOnline</wsa:Address>
       </wsa:EndpointReference>
      </wsp:AppliesTo>
      <wst:KeyType>http://schemas.xmlsoap.org/ws/2005/05/identity/NoProofKey</wst:KeyType>
    </wst:RequestSecurityToken>
   </s:Body>
 </s:Envelope>
When provided with valid credentials a SAML token with assertion will be provided as response. The assertion is as follows:
 <RequestedSecurityToken>
     <ns1:Assertion xmlns:ns1="urn:oasis:names:tc:SAML:1.0:assertion">
       ......
       .........
       ..............
     </ns1:Assertion>
   </RequestedSecurityToken>
- Step 3
The above response is appended as part of the following request and posted to https://login.microsoftonline.com/RST2.srf
Request
Request
 <?xml version="1.0" encoding="UTF-8"?>
 <S:Envelope xmlns:S="http://www.w3.org/2003/05/soap-envelope" xmlns:wsse="http://docs.oasis-open.org/wss/2004/01/oasis-200401-wss-wssecurity-secext-1.0.xsd" xmlns:wsp="http://schemas.xmlsoap.org/ws/2004/09/policy" xmlns:wsu="http://docs.oasis-open.org/wss/2004/01/oasis-200401-wss-wssecurity-utility-1.0.xsd" xmlns:wsa="http://www.w3.org/2005/08/addressing" xmlns:wst="http://schemas.xmlsoap.org/ws/2005/02/trust">
   <S:Header>
     <wsa:Action S:mustUnderstand="1">http://schemas.xmlsoap.org/ws/2005/02/trust/RST/Issue</wsa:Action>
     <wsa:To S:mustUnderstand="1">https://login.microsoftonline.com/rst2.srf</wsa:To>
     <ps:AuthInfo xmlns:ps="http://schemas.microsoft.com/LiveID/SoapServices/v1" Id="PPAuthInfo">
       <ps:BinaryVersion>5</ps:BinaryVersion>
       <ps:HostingApp>Managed IDCRL</ps:HostingApp>
     </ps:AuthInfo>
     <wsse:Security>
       <ns1:Assertion xmlns:ns1="urn:oasis:names:tc:SAML:1.0:assertion">
        ........
        ..........
        ............
       </ns1:Assertion>
     </wsse:Security>
   </S:Header>
   <S:Body>
     <wst:RequestSecurityToken xmlns:wst="http://schemas.xmlsoap.org/ws/2005/02/trust" Id="RST0">
       <wst:RequestType>http://schemas.xmlsoap.org/ws/2005/02/trust/Issue</wst:RequestType>
       <wsp:AppliesTo>
         <wsa:EndpointReference>
           <wsa:Address>[Domain Address]</wsa:Address>
         </wsa:EndpointReference>
       </wsp:AppliesTo>
       <wsp:PolicyReference URI="MBI"></wsp:PolicyReference>
     </wst:RequestSecurityToken>
   </S:Body>
 </S:Envelope>
Response
We will receive a RequestedSecurityToken as part of response from STS as follows:
 <wst:RequestedSecurityToken>
         <wsse:BinarySecurityToken Id="Compact0">t=EwDwA..........</wsse:BinarySecurityToken>
 </wst:RequestedSecurityToken>
Extract the value in BinarySecurityToken tag.
- Step 4
The value in BinarySecurityToken is posted to SharePoint Online as follows:
Request:
 POST https://mydomain.com/_forms/default.aspx?apr=1&wa=wsignin1.0
 Content-Type: application/x-www-form-urlencoded; charset=UTF-8
 t=EwDwA..............
Response
In the response headers we receive the authentication cookies rtFa and FedAuth as response which can be used as part of request header for all further transactions with SharePoint Online.
References:
SharePoint Online remote authentication (and Doc upload)
Remote authentication in SharePoint Online
References:
SharePoint Online remote authentication (and Doc upload)
Remote authentication in SharePoint Online